

 Electronics
 Parts Required:
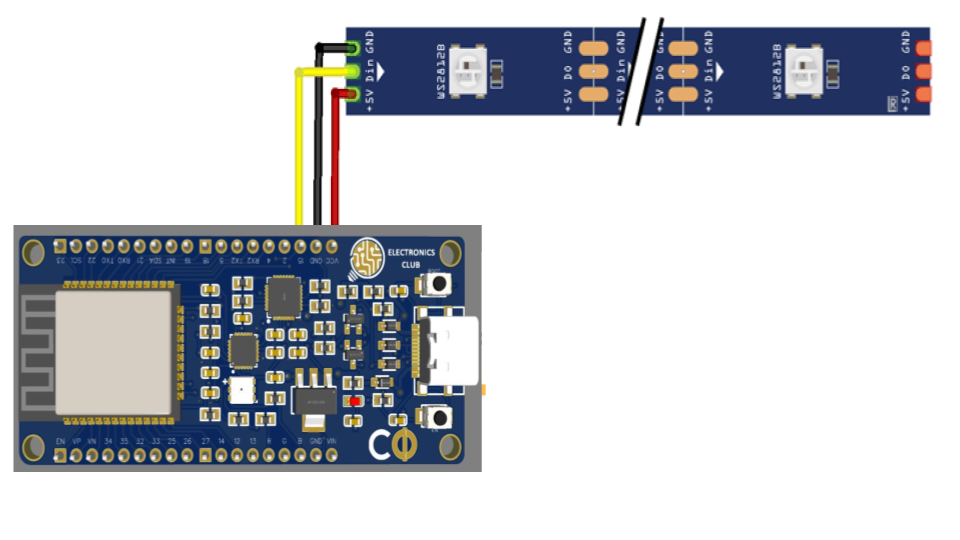
- 25 LEDs WS2812B NeoPixel LED Strip
- 5V, 2 AMP Power supply
- Electronics Club custom ESP32 Development board
- Breadboard
- Jumper wires
Schematic:
Blynk Application Setup for NeoPixel with ESP32
Blynk is an application that can run over Android and IOS devices to control any IoT devices using our smartphones. We can create our own Graphical user interface to design the IoT application GUI.
- Download Blynk application from Playstore or App store.
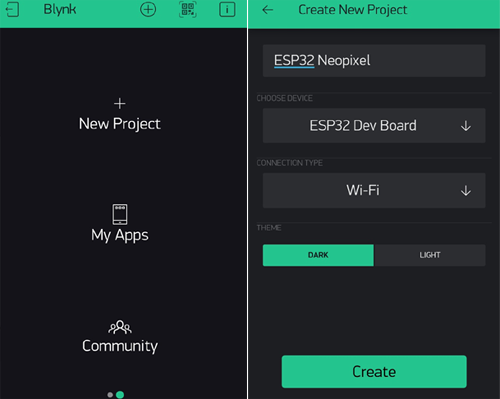
- Creating a new Project:
-After successful installation, open the application and click on “New Project”. Then it will pop up a new screen, where we need to set the parameters like Project name, board, and connection type. For this project, select the device as “ESP32 Dev Board” and connection type as Wi-Fi and click on “Create”.
- After the successful creation of the Project, we will get an Authenticate ID in our registered mail. Save the Authenticate ID for future reference.
- After the successful creation of the Project, we will get an Authenticate ID in our registered mail. Save the Authenticate ID for future reference.
- Creating the GUI:
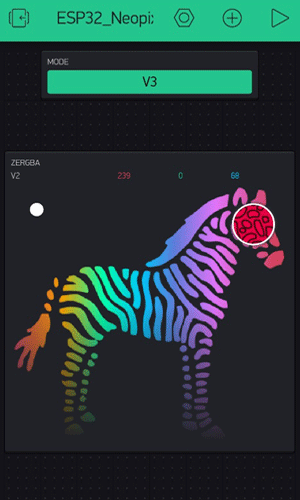
- Open the project in Blynk, click on the “+” sign where it will show many widgets. In our case, we need an RGB Color Picker which is listed as “zeRGBa” and a Button which will be used for changing the mode of operation in the LED strip.
- Open the project in Blynk, click on the “+” sign where it will show many widgets. In our case, we need an RGB Color Picker which is listed as “zeRGBa” and a Button which will be used for changing the mode of operation in the LED strip.
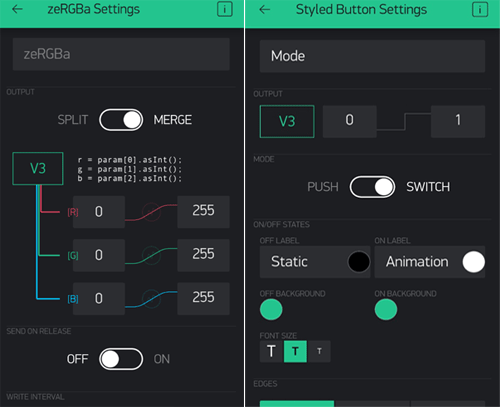
- Setting the Parameter in Widgets:
- After dragging the widgets to the project, now set its parameters which are used to send the color and mode of control values to ESP32.
- Click on ZeRGBa, then we will get a screen named ZeRGBa setting. Then set the Output option to “Merge” and set the pin to “V2” which is shown in the image below. Similarly, in Button settings, set the output pin to “V3” as shown in the figure below.
Libraries to include:
Here “Adafruit_NeoPixel.h” is used for controlling the RGB LED strip. For including Adafruit_NeoPixel.h library, download the library from this link and include it using the “Include ZIP Library” option.
Code:
#include <WiFi.h>
#include <WiFiClient.h>
#include <BlynkSimpleEsp32.h>
#include <Adafruit_NeoPixel.h>    // This library is used for controlling the RGB LED strip
#define PIN 15                    // Pin number
#define NUM 25                    // No of LEDs which is used in the strip
Adafruit_NeoPixel pixels = Adafruit_NeoPixel(NUM,PIN, NEO_GRB + NEO_KHZ800);    // NeoPixel strip object
char auth[] = "HoLYSq-Sxxxx";
char ssid[] = "admin";
char pass[] = "12345678";
int r,g,b,data;
void setup()
{
  Serial.begin(115200);
  Blynk.begin(auth, ssid, pass);
  pixels.begin();
}
void loop()
{
  Blynk.run();
}
// BLYNK_WRITE function is written to check for incoming data at V3 and V2 Virtual terminal, then assign them in three different variables. The variable r, g, b here represents the value of Red, Green, and Blue code of the selected color. Then these values are sent to the function static1 which is used for driving the LED strip.
BLYNK_WRITE(V2)
{
r = param[0].asInt();
g = param[1].asInt();
b = param[2].asInt();
if(data==0)
static1(r,g,b);
}
BLYNK_WRITE(V3)
{
data = param.asInt();
Serial.println(data);
if(data==0)
{
  static1(r,g,b);
}
else if(data==1)
{
  animation1();
}
}
// Static1 () function is used to drive the LED strip with distinct colors. Here, pixels.setPixelColor is used for driving the LED as per our required color.
void static1(int r, int g, int b)
{
  for(int i=0;i<=NUM;i++)
  {
  pixels.setPixelColor(i, pixels.Color(r,g,b));
  pixels.show();
  }
}
// Animation1() function is used to run a customized animation using LEDs. Different animations can be made as per the user's choice as shown below.
void animation1()
{
  for(int i=0;i<NUM;i++)
  {
    pixels.setPixelColor(i, pixels.Color(255,0,0));
    pixels.show();
    delay(100);
  }
  for(int i=NUM;i>=0;i--)
  {
    pixels.setPixelColor(i, pixels.Color(0,255,0));
    pixels.show();
    delay(100);
  }
  for(int i=0;i<NUM;i++)
  {
    pixels.setPixelColor(i, pixels.Color(0,255,255));
    pixels.show();
    delay(100);
  }
  for(int i=NUM;i>=0;i--)
  {
    pixels.setPixelColor(i, pixels.Color(255,255,0));
    pixels.show();
    delay(100);
  }
}
Links:
This tutorial is extracted from here. For more detailed explanation, you can refer to this link.